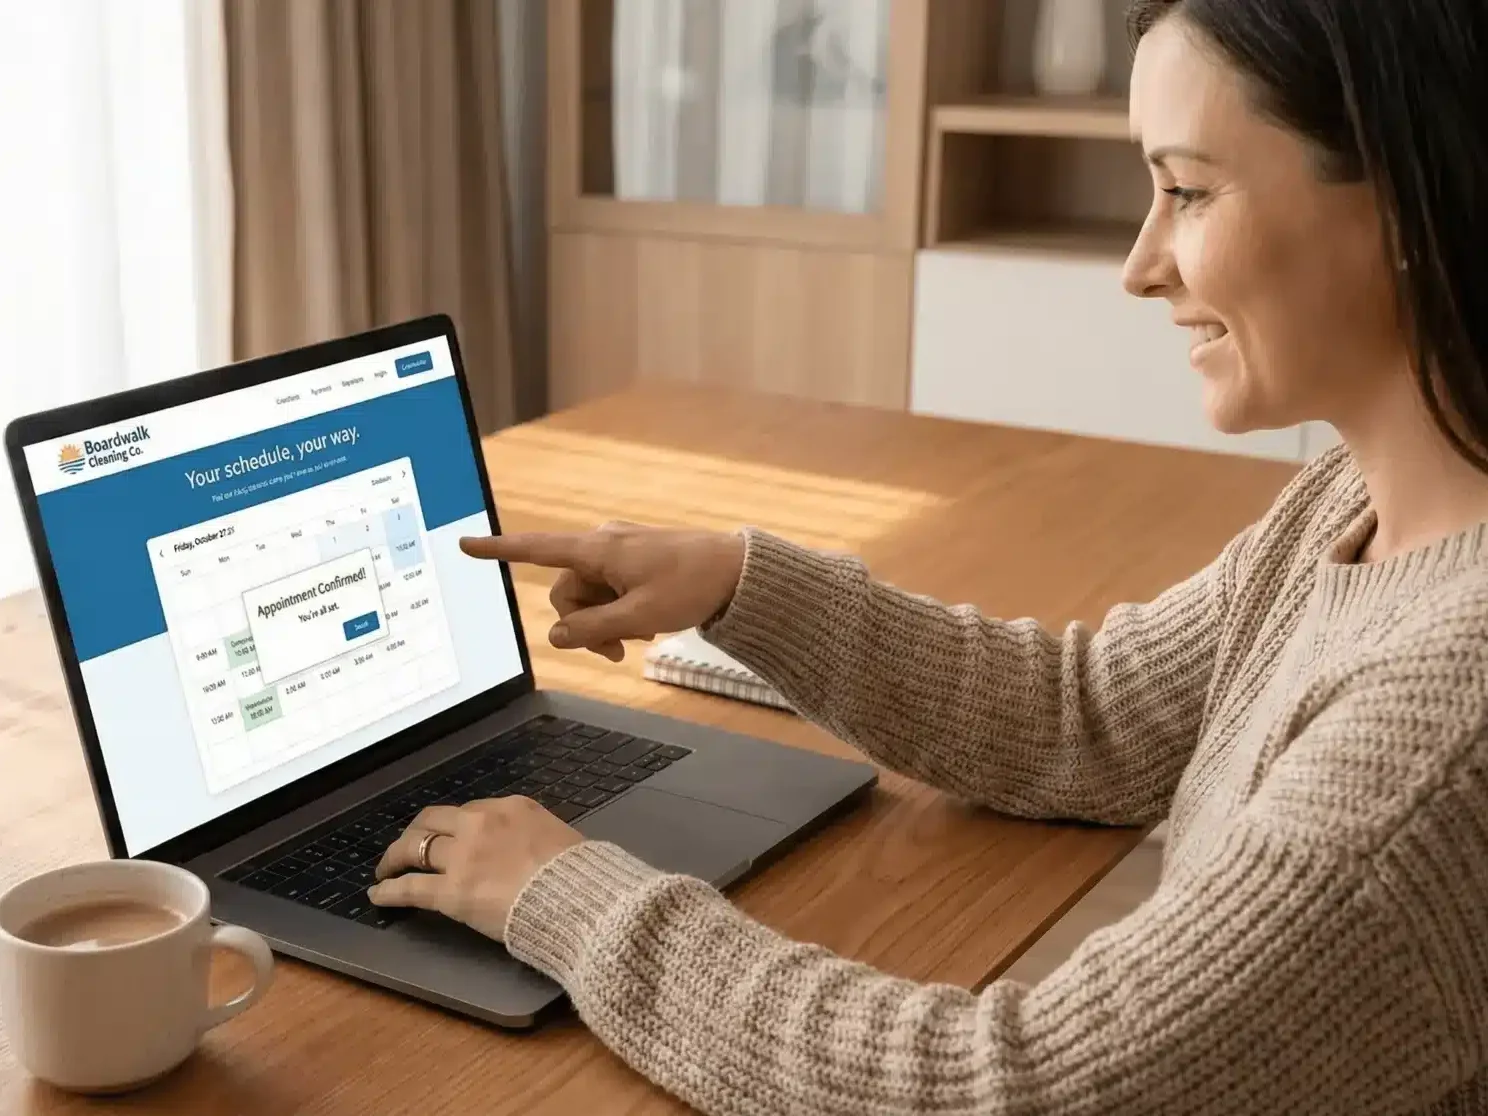
Have you ever felt overwhelmed by the thought of deep cleaning your home? You’re not alone. Many people struggle to start because they don’t know where to begin. That’s where a deep cleaning checklist comes in handy. It breaks down the process into manageable tasks, making it less daunting. Hiring a deep cleaning service complements this guide, which will walk you through a detailed deep-cleaning checklist for every room in your house, ensuring every corner gets the attention it needs.

Contents hide

Here’s what you’ll learn:

  • The best tools and products for effective deep cleaning.
  • Room-by-room tasks: Specific steps to tackle each area, ensuring everything is noticed.
  • Tips to maintain a clean home: Simple habits to keep your space tidy longer.

This checklist is your roadmap to a cleaner, fresher home. It’s designed to help you clean thoroughly and efficiently without forgetting any spots. You’ll find valuable insights here whether you’re a cleaning novice or looking to refine your routine.

Why keep reading? Because a clean home is more than just nice to look at. It’s about creating a healthy, calming space to relax and thrive. Dive into the full article to transform your cleaning approach and enjoy the benefits of a truly clean home.

Gather Your Cleaning Supplies

Before you start the deep cleaning process, it’s crucial to have all your cleaning supplies ready. This preparation makes the task smoother and ensures you can tackle any dirt or grime you encounter. Let’s look at the essential cleaning supplies you’ll need for a thorough, deep clean.

List of Essential Cleaning Supplies for Deep Cleaning

  1. Microfiber Cloths: These cloths are perfect for dusting and polishing surfaces. They trap dust effectively without leaving any streaks behind.
  2. All-Purpose Cleaner: A good all-purpose cleaner is a must-have. It works on multiple surfaces, saving you time and storage space.
  3. Disinfectant Wipes: For areas that need sanitizing, like doorknobs and light switches, disinfectant wipes are convenient and effective.
  4. Glass Cleaner: To keep windows and mirrors sparkling, a streak-free glass cleaner is essential.
  5. Baking Soda: This natural product is great for removing tough stains and odors, especially in the kitchen.
  6. White Vinegar: Another natural cleaner, white vinegar, is excellent for cutting through grease and lime scale.
  7. Scrub Brushes: Different sizes of scrub brushes help you tackle grime in bathrooms and kitchens.
  8. Rubber Gloves: Protect your hands from harsh chemicals and dirt with a sturdy pair of rubber gloves.
  9. Duster with Extendable Handle: This tool helps you reach high places, like ceiling fans and top shelves, without straining.
  10. Vacuum Cleaner with Attachments: A vacuum cleaner with various attachments is ideal for cleaning floors, upholstery, and tight corners.
  11. Mop and Bucket: A good mop and bucket set is necessary to remove dirt and sticky spills from hard floors.

Having these supplies on hand means you’re ready to tackle any cleaning challenge. Each item is crucial in ensuring your home is not only clean but also healthy and inviting. Remember, the goal of deep cleaning is not only to make your home look good but also to create a space that feels great to live in.

As you gather your supplies, consider the specific needs of your home. For example, consider including a quality wood polish in your kit if you have a lot of wooden furniture. Similarly, homes with pets could benefit from a pet hair removal tool. Tailoring your cleaning supply list to your home’s unique requirements ensures a more efficient and effective deep clean.

Now that your cleaning supplies are ready, you’re well-prepared to start the deep cleaning process. This preparation phase is crucial because it sets the stage for a successful cleaning day. With everything you need at your fingertips, you can move seamlessly from one task to the next, making the most of your time and effort.

Set Aside Enough Time

Allocating enough time for deep cleaning is crucial. It ensures you can thoroughly clean each area without rushing. This section offers tips on how to plan your time effectively, ensuring your deep cleaning efforts are efficient and stress-free.

Tips on How to Allocate Sufficient Time for Deep Cleaning

  • Make a Schedule: Decide on a day or weekend for deep cleaning. Mark it on your calendar as a reminder.
  • Break It Down: Instead of tackling everything immediately, break down the cleaning into manageable sections. For example, plan to clean one room or area per day.
  • Estimate Time: For each section, estimate how long it might take. Add an extra hour to each estimate to account for unexpected challenges.
  • Prioritize Tasks: Start with the areas that need the most attention. This approach ensures the most important tasks get done first.
  • Set Timers: Use timers to stay on track. Allocating specific time blocks to each task can increase your focus and efficiency.
  • Involve Others: If possible, get family members or roommates involved. Assign tasks based on each person’s strengths and availability.

By following these tips, you can make deep cleaning less overwhelming. Planning and dividing the work makes the task more manageable and less time-consuming. Remember, the goal is to clean thoroughly, not to finish as quickly as possible. Taking time ensures you do a good job, leading to a cleaner and more comfortable home.

It’s also helpful to keep a flexible mindset. Sometimes, cleaning might take longer than expected. If you find yourself running out of time, adjust your schedule. The key is to maintain progress, not perfection. Over time, you’ll get a better sense of how much you can accomplish in a given timeframe, allowing you to plan more accurately in the future.

In addition to setting aside enough time, it’s essential to stay motivated throughout the cleaning process. Creating a playlist of your favorite upbeat songs or listening to an audiobook can make cleaning more enjoyable. Also, consider rewarding yourself after completing each section or deep cleaning. This reward could be anything from a relaxing bath to a special treat.

Finally, remember that deep cleaning is an investment in your home’s comfort and health. By allocating sufficient time and approaching the task positively, you can transform your living space into a cleaner, more inviting place. In the next section, we’ll explore specific deep cleaning tasks for each room, providing a comprehensive guide to tackle every corner of your home.

Deep cleaning checklist Austin

Room-by-Room Deep Cleaning Checklist

Step-by-Step Kitchen Deep Cleaning

Step 1: Clean and Degrease Appliances

Start with your kitchen appliances. They work hard and deserve a thorough clean. Here’s how:

  • Refrigerator: Empty it out and use a mix of water and baking soda to wipe the inside. Don’t forget the door seals.
  • Oven: Apply an oven cleaner and let it sit before scrubbing. For a natural option, use a paste of baking soda and water.
  • Microwave: Heat a bowl of water with lemon inside for a few minutes, then wipe the interior with a cloth.
  • Dishwasher: Run it empty with a dishwasher cleaner or white vinegar to remove any grease and odors.

Step 2: Disinfect Countertops and Cabinets

Countertops and cabinets are next. They see a lot of action every day, so it’s important to keep them clean and germ-free.

  • Countertops: Wipe them down with an all-purpose cleaner or a solution of water and vinegar. Pay extra attention to areas around the sink.
  • Cabinets: Clean the outside with a damp cloth and mild detergent. For the inside, remove everything, wipe down the shelves, and organize as you put items back.

Step 3: Scrub and Polish Floors

Finish with the floors. They can accumulate a lot of dirt and grime, especially in high-traffic areas.

  • Tile or Linoleum: Use a mixture of hot water and an all-purpose cleaner. For tough stains, a paste of baking soda and water works well.
  • Hardwood: Sweep or vacuum first, then mop with a cleaner suitable for hardwood. Avoid too much water to prevent damage.

This kitchen deep cleaning checklist will help ensure your cooking space is not only sparkling but also hygienic. Remember, a clean kitchen is the heart of a happy home. Keep this checklist handy and your kitchen will always be ready for whatever cooking adventure comes next.

Step-by-Step Bathroom Kitchen Deep Cleaning

Step 1: Clean and Disinfect Toilet

The toilet is a critical spot that needs regular deep cleaning to maintain hygiene and freshness. Here’s a simple checklist:

  • Inside the Bowl: Use a toilet bowl cleaner and a brush to scrub inside the bowl. A pumice stone can be effective for hard water stains.
  • Exterior and Seat: Wipe down the exterior, seat, and lid with a disinfectant spray or wipes. Remember the base and behind the toilet.
  • Tank: Occasionally, clean the tank to prevent mold and mildew. Pour white vinegar into the tank, let it sit, then flush.

Step 2: Scrub Shower and Bathtub

Soap scum and mildew can build up quickly in showers and bathtubs. Follow these steps for a sparkling clean:

  • Walls and Doors: Apply a bathroom cleaner and let it sit before scrubbing. For glass doors, a squeegee helps prevent water spots.
  • Bathtub: Use a non-abrasive cleaner and a scrub brush for the tub. Baking soda can help remove tough stains.
  • Drain: Remove hair and debris. For slow drains, a mixture of baking soda and vinegar followed by hot water can clear blockages.

Step 3: Clean and Shine Mirrors and Fixtures

Mirrors and fixtures can accumulate water spots and fingerprints, dulling their shine. Keep them gleaming with these tips:

  • Mirrors: Use a glass cleaner and a microfiber cloth for a streak-free shine. Wiping in a circular motion can help avoid streaks.
  • Fixtures: Wipe faucets and showerheads with a damp cloth. For hard water buildup, use vinegar. Soak a cloth in vinegar, wrap it around the fixture, and let it sit before rinsing.

By following this bathroom deep cleaning checklist, you’ll ensure your bathroom is not only clean but also a pleasant and hygienic space. Regular deep cleaning prevents the buildup of germs and grime, making your bathroom a healthier place for your family. Remember, a clean bathroom is a key component of a comfortable home. Keep this guide handy to make your bathroom cleaning tasks more manageable and effective.

Step-by-Step Living Room Deep Cleaning Checklist

Step 1: Dust and Vacuum Furniture

The living room is a hub of activity, making it essential to keep it clean and inviting. Here’s how to tackle your furniture:

  • Sofas and Chairs: Use the upholstery attachment on your vacuum cleaner to remove dust and crumbs. For leather, wipe with a damp cloth and conditioner.
  • Shelves and Tables: Dust with a microfiber cloth. For wood furniture, consider using a wood cleaner to enhance its shine.
  • Curtains and Blinds: Vacuum curtains with a brush attachment. Wipe blinds with a damp cloth or use a duster.

Step 2: Clean Electronics and Decor Items

Electronics and decor items can be magnets for dust. Keeping them clean improves their function and the room’s overall look.

  • TVs and Monitors: Dust with a microfiber cloth. Use a screen cleaner for fingerprints and smudges.
  • Remote Controls: Wipe down with disinfectant wipes. Remove batteries and clean the compartment if necessary.
  • Decorative Items: Dust items like picture frames, lamps, and knick-knacks. Be gentle with fragile items.

By following this checklist, your living room will look cleaner and feel more welcoming. Regular cleaning of furniture and decor helps maintain a healthy environment, reducing allergens and improving air quality. A tidy living room makes for a more enjoyable space to relax and entertain guests.

Remember, the key to effective cleaning is consistency. Incorporating these tasks into your regular cleaning routine ensures your living room remains a comfortable retreat for family and friends. Keep this guide handy to make your living room cleaning efforts as efficient and thorough as possible.

Deep cleaning checklist in Austin

Step-by-Step Bedroom Deep Cleaning Checklist

Step 1: Wash Bedding and Pillows

A fresh and clean bedroom starts with the bedding. Here’s how to ensure a cozy, clean sleeping environment:

  • Sheets and Pillowcases: Wash these at least every two weeks in warm water to kill germs and dust mites.
  • Comforters and Blankets: Depending on use, wash these every month. Follow the care label instructions for the best results.
  • Pillows: Remember your pillows. Wash them every three to six months. Ensure they are scorched to prevent mold.

Step 2: Dust and Clean Furniture

Bedroom furniture collects dust and needs regular cleaning to maintain a healthy environment.

  • Surfaces: Use a microfiber cloth to dust surfaces like nightstands, dressers, and headboards. A damp cloth can help remove stubborn dust.
  • Under the Bed: Vacuum or sweep under the bed to remove dust and allergens that accumulate in this often-neglected area.
  • Drawers: Empty and wipe down the inside of drawers to keep your clothes in a clean space.

Step 3: Organize and Clean Closets

A cluttered closet can make a bedroom feel disorganized. Tackle this space with these steps:

  • Declutter: Start by removing everything. Donate or discard items you no longer need or use.
  • Clean: Wipe down shelves and rods. Vacuum the closet floor, especially the corners.
  • Organize: Put everything back in an organized manner. Use boxes or dividers to keep items tidy and accessible.

By following this checklist, your bedroom will not only look clean but also feel more peaceful and relaxing. Regular cleaning and decluttering can transform your bedroom into a serene retreat, promoting better sleep and relaxation. Remember, a clean bedroom is key to starting and ending your day on a positive note. Keep this guide handy to maintain a clean and organized bedroom throughout the year.

Step-by-Step Dining Room Deep Cleaning Checklist

Step 1: Clean and Polish Table

The dining table is not just for meals; it’s a gathering spot for family and friends. Keeping it clean and polished is essential.

  • Daily Cleaning: Wipe the table after each use with a damp cloth to remove crumbs and spills.
  • Deep Cleaning: Once a week, use a wood cleaner or a mixture of water and mild soap for deep cleaning. Dry it thoroughly to avoid water marks.
  • Polishing: Apply furniture polish monthly to keep the wood nourished and looking its best. Always follow the grain of the wood when polishing.

Step 2: Wipe Down Chairs and Surfaces

Chairs and other surfaces in the dining room also need attention to keep the area welcoming and clean.

  • Chairs: Clean the seats and backs with a suitable cleaner for the material. Use a fabric cleaner to remove any stains or odors for upholstered chairs.
  • Buffet and Sideboards: Dust and wipe these surfaces weekly. Use a mild cleaner and a soft cloth to avoid scratching the surface.
  • Decorations and Light Fixtures: Dust any decorative items, picture frames, and light fixtures to keep the dining room bright and inviting.

Maintaining a clean dining room creates a pleasant environment for enjoying meals and hosting gatherings. Regular cleaning keeps the space looking great and helps prolong the life of your furniture and decor. Remember, a clean dining room reflects the care and attention you put into your home. Keep this checklist handy to ensure your dining area remains a clean, welcoming space for everyone who uses it.

Tips and Tricks for Cleaning Efficiency

Cleaning your home deeply doesn’t have to eat up your entire weekend. With the right strategies, you can make the process quicker and more effective. Here are some tips and tricks to boost your cleaning efficiency:

  1. Start High, End Low: Always begin cleaning at the highest point in a room, like ceiling fans or shelves, and work your way down. This method ensures that any dust or debris that falls will be cleaned up in the lower cleaning stages.
  2. Declutter First: Before you start cleaning, take a few minutes to declutter each room. Removing items that don’t belong in a room not only makes cleaning easier but also helps you focus on the task at hand.
  3. Use the Right Tools: Invest in quality cleaning tools like microfiber cloths, a high-efficiency particulate air (HEPA) vacuum, and extendable dusters. These tools can significantly reduce your cleaning time and increase effectiveness.
  4. Batch Tasks: Group similar cleaning tasks together. For example, do all your dusting first, then move on to vacuuming. This approach prevents you from constantly switching tools and cleaning products, saving time.
  5. Set a Timer: Challenge yourself by setting a timer for each cleaning task. This can help you stay focused and motivated to finish the task more quickly.
  6. Listen to Music or Audiobooks: Make cleaning more enjoyable by listening to your favorite music or an audiobook. This can make the time pass faster and increase your productivity.
  7. Involve Family Members: Turn cleaning into a family activity. Assign tasks to each family member based on their age and abilities. Working together makes the work lighter and teaches responsibility.
  8. Keep Cleaning Supplies Organized: Store your cleaning supplies in a portable caddy or cart. This makes moving from room to room easy without searching for supplies.
  9. Focus on One Room at a Time: Resist the temptation to jump from one task to another in different rooms. Completing one room before moving to the next can give you a sense of accomplishment and keep you motivated.
  10. Regular Maintenance: Finally, maintain a regular cleaning schedule. The more frequently you clean, the less time it will take each time. Quick daily or weekly touch-ups can prevent the need for longer, more intense cleaning sessions.

By incorporating these tips into your cleaning routine, you’ll find that deep cleaning your home becomes a more manageable and less daunting task. Efficiency in cleaning not only saves time but also leaves you with a sparkling home that you can enjoy and be proud of. Remember, the key to effective cleaning is not working harder but smarter.

Use Multi-Purpose Cleaners

Choosing multi-purpose cleaners for your home cleaning routine offers several benefits. These versatile products can simplify cleaning, save space, and even be kinder to your wallet. Let’s explore why incorporating multi-purpose cleaners into your routine can be a game-changer.

Benefits of Using Versatile Cleaning Products

  1. Saves Money: Instead of buying a different cleaner for each surface or room, a good multi-purpose cleaner can handle most tasks. This consolidation can lead to significant savings over time.
  2. Reduces Clutter: With one product doing the job of several, you’ll have fewer bottles and cans to store. This is especially beneficial in smaller homes or apartments where storage space is at a premium.
  3. Simplifies Cleaning Routine: When you have one go-to product for multiple cleaning needs, it streamlines your cleaning process. Switching between different cleaners for different surfaces is unnecessary, making your cleaning faster and more efficient.
  4. Eco-Friendly Options: Many multi-purpose cleaners are designed with the environment in mind. By using fewer products, you’re reducing waste and potentially choosing options with less harmful chemicals.
  5. Effective Cleaning: Modern multi-purpose cleaners are formulated to be highly effective on a wide range of surfaces. Whether it’s grease in the kitchen or soap scum in the bathroom, these cleaners can tackle it all.

When selecting a multi-purpose cleaner, look for one that suits the surfaces in your home and meets your preferences for ingredients and scent. Some products are designed for general cleaning, while others may have disinfectant properties for sanitizing areas.

Remember, while multi-purpose cleaners are incredibly versatile, some tasks or surfaces may require a specialized product. Always read the label to ensure the cleaner is suitable for the job, and test it on a small area if you’re unsure.

Incorporating multi-purpose cleaners into your cleaning arsenal can make maintaining a clean, healthy home simpler and more enjoyable. By choosing the right products, you can streamline your cleaning routine, save space, and focus on enjoying your clean space.

Deep cleaning checklist Austin TX

Delegate Cleaning Tasks

Getting family members or housemates involved in cleaning can make maintaining a clean home much easier and faster. Sharing the workload lightens your burden and fosters a sense of responsibility and teamwork. Here’s how to effectively delegate cleaning tasks.

How to Involve Family Members or Housemates in Cleaning

  1. Hold a Meeting: Discuss the importance of everyone contributing to the home’s cleanliness. Highlight how a clean environment benefits everyone.
  2. Assess Strengths and Preferences: Some people might be better at certain tasks than others. Take into account personal strengths and preferences when assigning tasks.
  3. Create a Cleaning Schedule: Develop a schedule that outlines who does what and when. This ensures that everyone knows their responsibilities and can plan accordingly.
  4. Be Clear About Expectations: Ensure everyone understands what is expected for each task. Providing a checklist can help clarify what a properly completed task looks like.
  5. Rotate Tasks: To keep things fair and prevent boredom, rotate cleaning tasks regularly. This way, everyone gets a turn doing the less desirable jobs.
  6. Use Positive Reinforcement: Acknowledge and appreciate everyone’s efforts. A little praise can go a long way in motivating continued participation.
  7. Make It Fun: Try to make cleaning less of a chore and more of a fun activity. Listening to music, making it a game, or rewarding yourselves with a group activity afterward can make cleaning something everyone looks forward to.
  8. Provide the Necessary Tools: Ensure cleaning supplies are easily accessible to everyone involved. Having the right tools can make the tasks easier and more efficient.
  9. Lead by Example: Show your commitment to keeping the home clean by actively participating in the cleaning tasks. Leading by example can inspire others to follow suit.
  10. Be Flexible: Understand that everyone has different schedules and capacities. Be willing to adjust the plan as needed to accommodate everyone’s needs.

By delegating cleaning tasks effectively, you can create a collaborative environment where everyone contributes to the upkeep of the home. This ensures that your living space remains clean and tidy and builds a sense of shared responsibility and teamwork. Remember, the goal is to maintain a clean home together, making the process as enjoyable and fair as possible for everyone involved.

Conclusion

Deep cleaning your home isn’t just a chore – it improves your living environment. Our checklist tackles every corner for a healthier, more welcoming space. Don’t be daunted! The checklist breaks it down into manageable steps, making it easy for everyone to contribute. This deep clean is an investment in your health and home’s longevity. Start today – schedule your cleaning, gather supplies, and get everyone involved. Aim for progress, not perfection, and enjoy a cleaner, more organized space.

Frequently Asked Questions

How often should I deep clean my home?

Deep cleaning your home is essential for maintaining a healthy and comfortable living environment. Ideally, you should aim to deep clean your home every 3 to 6 months. This schedule helps tackle areas not part of your regular cleaning routine, like under furniture, inside appliances, and high shelves. Deep cleaning addresses visible dirt and clutter and targets hidden germs and allergens, improving indoor air quality. Remember, the frequency can vary based on pets, allergies, and the number of people living in your home. A consistent schedule ensures your living space stays welcoming and hygienic throughout the year.

What are some eco-friendly cleaning alternatives?

Eco-friendly cleaning alternatives are great for those looking to reduce their environmental impact while keeping their homes clean. Common natural ingredients like white vinegar, baking soda, and lemon juice can be powerful cleaning agents. For example, vinegar is excellent for removing grease and disinfecting surfaces, while baking soda is a gentle abrasive that can tackle tough stains. Lemon juice, with its natural acidity, is perfect for shining and removing odors. Combining these ingredients can create effective cleaners for various tasks without the harsh chemicals found in many commercial products. Additionally, using reusable microfiber cloths instead of disposable wipes reduces waste.

Can I hire a professional cleaning service for deep cleaning?

Yes, hiring a professional cleaning service for deep cleaning is a popular option for those who may not have the time, ability, or desire to tackle the task themselves. Professional cleaners bring experience, efficiency, and their own supplies to thoroughly clean your home from top to bottom. They can often address areas that might be overlooked or too challenging to clean. When choosing a service, look for companies with good reviews, transparent pricing, and a list of the specific tasks they cover. Ensure they use products and methods that align with your preferences, especially if you’re interested in eco-friendly cleaning solutions.

What should I do if I don’t have all the cleaning supplies?

If you find yourself missing some cleaning supplies, don’t worry. Many household items can double as effective cleaning solutions. For instance, water and vinegar can clean most surfaces, and olive oil can polish wood. If you’re missing a specific tool, think of an alternative; for example, an old toothbrush can serve as a small scrubbing tool. Additionally, consider making a list of essential supplies for future reference to build up your collection gradually. Remember, the goal is to make your home cleaner and more comfortable, so improvising with what you have is perfectly okay.

How long does it typically take to deep clean a house?

The time it takes to deep clean a house can vary widely based on the size of your home, the level of cleanliness, and how many people are helping. On average, it can take anywhere from a few hours to a full weekend. For a single person cleaning a medium-sized home, setting aside a full day is a good rule of thumb. Breaking the tasks into manageable sections and focusing on one room at a time can help make the process more efficient. Remember, deep cleaning doesn’t have to be done all at once. Spreading out tasks over several days or weekends can make the process less daunting and more manageable.

Experience the Ultimate Deep Clean with The Boardwalk Cleaning Co. in Austin, TX

The Boardwalk Cleaning Co. in Austin, TX understands the importance of a clean, healthy home. Our team is dedicated to providing top-notch deep cleaning services that meet your every need. With our expertise, we ensure every corner of your home shines, using eco-friendly products and efficient methods. If you’re looking for a reliable, thorough cleaning service in Austin. Contact The Boardwalk Cleaning Co. today and experience the peace of mind that comes with a professionally cleaned home. Let us help you make your space a sanctuary.

author avatar
Jessica Duarte Co-Founder & Owner
High-impact leader with ability to bring out the best in others and consistently exceed goals. I've been in the maid service business for 21 years and like a lot of small business owners, I started in my garage with a mop, a bucket and a dream.